![]()
Features
- Hot water temperature control
- Heating temperature control
- Smart heating temperature control modes:
- PID
- Equithermic curves - adjusts the temperature based on indoor and outdoor temperatures
- Hysteresis setting (for accurate maintenance of room temperature)
- Ability to connect an external sensor to monitor outdoor temperature (DS18B20)
- Emergency mode. If the Wi-Fi connection is lost or the gateway cannot connect to the MQTT server, the mode will turn on. This mode will automatically maintain the set temperature and prevent your home from freezing. In this mode it is also possible to use equithermal curves (weather-compensated control).
- Automatic error reset (not with all boilers)
- Diagnostics:
- The process of heating the coolant for heating: works / does not work
- The process of heating water for hot water: working / not working
- Display of boiler errors
- Burner status: on/off
- Burner modulation level in percent
- Pressure in the heating system
- Gateway status (depending on errors and connection status)
- Boiler connection status via OpenTherm interface
- The current temperature of the heat carrier (usually the return heat carrier)
- Set coolant temperature (depending on the selected mode)
- Current hot water temperature
- Auto tuning of PID and Equitherm parameters (in development)
- Home Assistant integration via MQTT. The ability to create any automation for the boiler!

Tested on
| Boiler | Master Member ID |
|---|---|
| BAXI ECO Nova | default or 4 |
| BAXI Ampera | 1028 |
PCB


Housing for installation on DIN rail - D2MG. Occupies only 2 DIN modules.
The 220V > 5V power supply is already on the board, so additional power supplies are not needed.
To save money, 2 levels are ordered as one board. After manufacturing, the boards need to be divided into 2 parts - upper and lower.
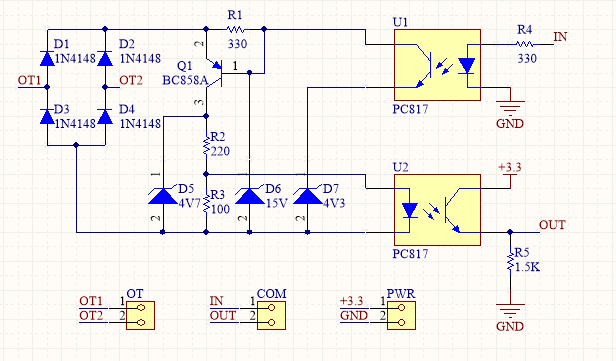
Important! On this board opentherm IN pin = 5, OUT pin = 4
Another compatible Open Therm Adapters
- Ihor Melnyk OpenTherm Adapter
- OpenTherm master shield for Wemos/Lolin
- And others. It's just that the adapter must implement the schema
Quick Start
Dependencies
- ESP8266Scheduler
- NTPClient
- ArduinoJson
- OpenTherm Library
- PubSubClient
- TelnetStream
- EEManager
- GyverPID
- microDS18B20
- WiFiManager
Settings
- Connect to OpenTherm Gateway hotspot
- Open configuration page in browser: 192.168.4.1
- Set up a connection to your wifi network
- Set up a connection to your MQTT server
- Set up a Opentherm pin IN & Opentherm pin OUT. Typically used IN = 4, OUT = 5
- if necessary, set the master member ID.
After connecting to your wifi network, you can go to the setup page at the address that esp8266 received. The OTGateway device will be automatically added to homeassistant if MQTT server ip, login and password are correct.
HomeAsssistant settings
By default, the "Equitherm" and "PID" modes are disabled. In this case, the boiler will simply maintain the temperature you set.
To use "Equitherm" or "PID" modes, the controller needs to know the temperature inside and outside the house.
The temperature inside the house can be set using simple automation:
sensor.livingroom_temperature - temperature sensor inside the house.
number.opentherm_indoor_temp - an entity that stores the temperature value inside the house. The default does not need to be changed.
  alias: Set boiler indoor temp
  description: ""
  trigger:
    - platform: state
      entity_id:
        - sensor.livingroom_temperature
    - platform: time_pattern
      seconds: /30
  condition: []
  action:
    - if:
        - condition: template
          value_template: "{{ has_value('number.opentherm_indoor_temp') and (states('sensor.livingroom_temperature')|float(0) - states('number.opentherm_indoor_temp')|float(0)) | abs | round(2) >= 0.01 }}"
      then:
        - service: number.set_value
          data:
            value: "{{ states('sensor.livingroom_temperature')|float(0)|round(2) }}"
          target:
            entity_id: number.opentherm_indoor_temp
  mode: single
If your boiler does not support the installation of an outdoor temperature sensor or does not provide this value via the opentherm protocol, then you can use an external DS18B20 sensor or use automation.
Simple automation
weather.home - weather entity. It is important that the address of your home is entered correctly in the Home Assistant settings.
number.opentherm_outdoor_temp - an entity that stores the temperature value outside the house. The default does not need to be changed.
  alias: Set boiler outdoor temp
  description: ""
  trigger:
    - platform: state
      entity_id:
        - weather.home
      attribute: temperature
      for:
        hours: 0
        minutes: 1
        seconds: 0
    - platform: time_pattern
      seconds: /30
  condition: []
  action:
    - if:
        - condition: template
          value_template: "{{ has_value('weather.home') and (state_attr('weather.home', 'temperature')|float(0) - states('number.opentherm_outdoor_temp')|float(0)) | abs | round(2) >= 0.1 }}"
      then:
        - service: number.set_value
          data:
            value: "{{ state_attr('weather.home', 'temperature')|float(0)|round(2) }}"
          target:
            entity_id: number.opentherm_outdoor_temp
  mode: single
About modes
Equitherm
Weather-compensated temperature control maintains a comfortable set temperature in the house. The algorithm requires temperature sensors in the house and outside.
Instead of an outdoor sensor, you can use the weather forecast and automation for HA.
Ratios:
N - heating curve coefficient. The coefficient is selected individually, depending on the insulation of the room, the heated area, etc.
Range: 0.3...10, default: 0.7, step 0.01
*K - сorrection for desired room temperature.
Range: 0...10, default: 3, step 0.01
T - thermostat correction.
Range: 0...10, default: 2, step 0.01
Instructions for fit coefficients:
Tip. To select coefficients, I created a table in Excel in which you can enter temperature parameters inside and outside the house and select coefficients. On the graph you can see the temperature that the boiler will set.
- The first thing you need to do is to fit the curve (N coefficient). If your home has low heat loss, then start with 0.5. Otherwise start at 0.7. When the temperature inside the house stops changing, increase or decrease the coefficient value in increments of 0.1 to select the optimal curve.
Please note that passive heating (sun) will affect the house temperature during curve fitting. This process is not fast and will take you 1-2 days. Important. During curve fitting, the temperature must be kept stable as the outside temperature changes. The temperature does not have to be equal to the set one.
For example. You fit curve 0.67; set temperature 23; the temperature in the house is 20 degrees while the outside temperature is -10 degrees and -5 degrees. This is good. - After fitting the curve, you must select the K coefficient. It influences the boiler temperature correction to maintain the set temperature. For example. Set temperature: 23 degrees; temperature in the house: 20 degrees. Try setting it to 5 and see how the temperature in the house changes after stabilization. Select the value so that the temperature in the house is close to the set.
- Now you can choose the T coefficient. Simply put, it affects the sharpness of the temperature change. If you want fast heating, then set a high value (6-10), but then the room may overheat. If you want smooth heating, set 1-5. Choose the optimal value for yourself.
Read more about the algorithm here.
PID
See Wikipedia.
In Google you can find instructions for tuning the PID controller.
Use Equitherm mode + PID mode
@todo
Debug
To display DEBUG messages you must enable debug in settings (switch is disabled by default). You can connect via Telnet to read messages. IP: esp8266 ip, port: 23